
Router Tips: How to Make Finger Joints
The hardest part when making finger joints is getting the precise fit. This is due to the fact that the chances of missing out altogether are very high. But you don’t have to worry about that when you can easily achieve this feat by making a little adjustment to the whole set up. However, the following steps will help you when making a perfect finger joint using router tips among other tools.
Make the Base
Step 1: Rout the Groove
Make a groove lengthwise down the piece of the plywood to prepaying the base. The base should be the same length as that of the router table. You are recommended to use the same type of router bit like the same one you will use in making finger joints which should be a ⅜ inch.
Step 2: Fasten a Runner
You can fasten the runner to the sled section on the base of plywood. The runner should fit in the base properly, and this is very crucial. As such rip, a little bit of the runner on the table saw to allow it to slide in the groove smoothly. Using a piece of block, sand one edge of the sled until it slides into the groove.
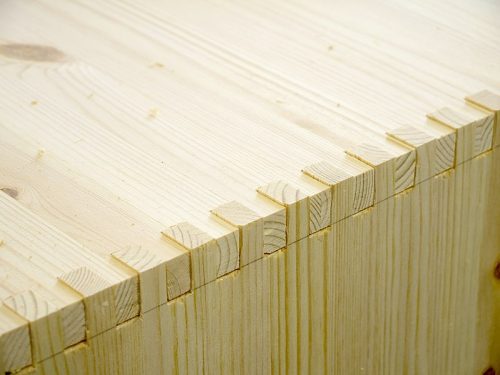
Source: Santeri Viinamäki under CC 4.0
Prepare the trial cut
Step 3: Clamp the base
You can clamp both sides of the base firmly to the router benchtop to allow the bit to be centered right in the hole. Allow the base’s groove to get at the front of the router bit while you are facing the router table. Raise the bit a little higher to be exactly at the same level as the thickness of the workpiece.
Step 4: Place the base in position
Position the base to make the runner to be exactly ⅜” from the bit.
Take a drill bit and use it as measuring equipment. But you can adjust the base by withdrawing the drill bit and loosening any of the clamps and then tapping gently at the base’s edge using a hammer. Check the spacing once more using the drill bit before tightening both sides of the clamps.
Trial Cuts
Step 5. Make the first notch
You can make the first notch using the router bit in the first piece of wood (test piece A). Proceed with marking one edge and let that be the bottom side. Tap the workpiece a little bit towards the runner before sliding the sled to and fro to make the notch through. Press down the sled gently to prevent it from tipping forward.
Step 6: Continue making notches
Making more notches across the test piece A using the router bit. Eventually, lift the workpiece while placing each notch on the runner as you carry on. This will result in producing a series of fingers of the same size as the notches.
Step 7: Make the first notch
With a router, make the first notch on the test piece B. At this time, one of the sides, where the notch is, should line up with the bottom side of the test piece B. In order to set this up, you must turn the piece A and clamp it firmly on the sled. By so doing, you will realize that its bottom fingers make perfect ⅜ “spacing. Once the first cut is over, set the test piece aside.
Step 8: You can but the notch at the end
In this step, you are required to but the notch at the end against both the runner and the rout. Afterward, you can continue with the cutting of notches across the entire Piece B in the same manner as you did with piece A.
Step 9: Assemble
By now, the two test pieces are ready to be assembled. At this point, they are supposed to slide together freely. On the other hand, you can facilitate the gluing process by making the ends of the fingers to be a little more even and below the mating piece of wood.
Step 10: Fine-tune the joints
This is done by adding a micro-adjust object in a bid to fine-tune those joints so that they can fit well. Again, you can tighten the finger joints by making the clamp loose and then pivot the base to the right. Eventually, you can reclamp the pieces against the block tightly to make the joints stronger. By the time you remove the clamps, the joint will be strong and firm.
Conclusion
Basically, this is a simple way you can make a finger joint using the router as your tool of choice. The process is fast, and the resulting piece of work is perfect.