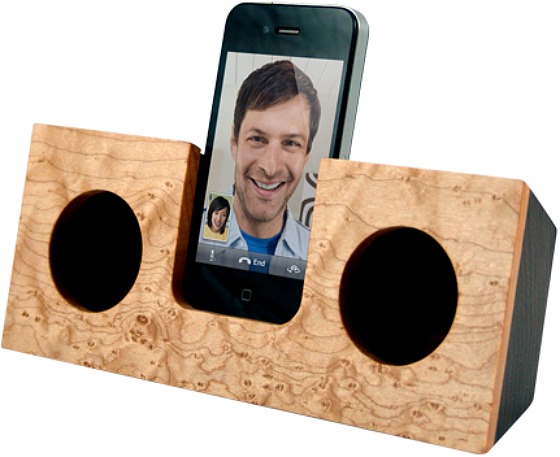
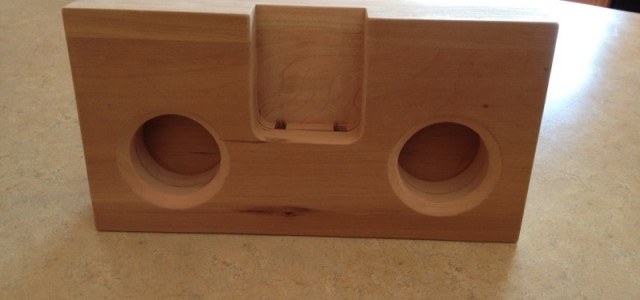
How to Make a Wooden iPhone Amplifier Using a Router
The woodworking router is one of the tools that is regarded as the most versatile. In simple terms, you can make almost anything and everything using a wood router. We all listen to music in our houses every time. Most of our favorite tunes are on our phones since the phone is the most convenient gadget that can be carried around when driving, showering, doing dishes, jogging, and many others. But do you know you can avoid spending lots of your money on an expensive Bluetooth speaker if you get to know how to make a wooden iPhone amplifier using a router?
Well, that is right, you can make a wooden phone amplifier using your router and there is no need for batteries or cords to do all this. All you require is a router, a few wood glued together and some a little painting just to get a stunning overall look.
How does wooden iPhone amplifier work?
Ever tried placing the speaker end of your phone into a bowl? How does it affect its volume? Did you realize how much the volume increases? If this resonates well with you, then this is the exact concept that is applied when making the iPhone amplifier. A hole is drilled at the very bottom of the amp which then leads to the “speaker” openings.
Once everything is glued together it is hard to see how the sound is channeled through the hole. The sound seeps through the opening and is forced to the left or the right where some openings are available and the sound can swirl around and in the process get amplified. The sound then comes out through the circle openings.
When you turn on your iPhone and listen to the sound quality of this improvised unit you will be amazed by its quality. The sound improves greatly with no actual speaker wiring or electricity provided. With this, you no longer need to keep unplugging your Bluetooth speakers and reset them each time. You now simply grab this mobile unit and carry it anywhere you want.
Erstellen Sie Ihre idealen Trainingspläne seriose steroide shops sparen sie bei der promo: beste qualität 2017 neue kleidung bodybuilding fitness jogger keuchen training elastische jogginghose mann hose casual ski.
How to Make Wooden iPhone Amplifier
Requirements
- ½ inch thick, 5 9/16 wide and 24-inch long wood plank (preferably poplar).
- A square wood dowel of approximately 3/4x ¾ inches and 41 inches long.
- Wood tools.
- Woodworking router.
- Sand paper.
- Wood glue.
- Clamps
- Stain, paint, or varnish (optional).
Procedure
Step 1
Cut the 24 inch long wood plank into two pieces measuring 12 inches each. Label one of the pieces No. 1 below and the other No. 3. Cut the dowels into the appropriate sizes.
Measurements:
No. 1:
- C: 12 inches.
- B: 5 9/16 inches.
- A: 4 9/16 inches.
- D: 2 13/16 inches.
- E: 2 7/8 inches.
No. 2
- C: 12 inches.
- B: 4 1/16 inches.
- A: 4 9/16 inches.
- D: 2 13/16 inches.
- E: 2 ½ inches.
- F: 1 7/16 inches.
No. 3
- A: 12 inches.
- B: 5 9/16 inches.
Step 2
Arrange the wood pieces such that the No. 2 is on the top of No. 3 and ensure that everything fits perfectly. Now the small opening for the iPhone speaker should have the enough width to fit the speaker holes. Ensure they line up properly.
Try to slide your phone carefully into the slot and make sure it fits in such a way that the speaker lies above the opening. Keep the small channel that carries sound as narrow as possible (1/2 inches). This is to ensure the sound is condensed until it reaches the larger areas of the amp where it is swirled around and released through the circle openings.

Step 3
Grab the No. 1 and try to locate the exact center of its two ends. Take a hole saw or a jig saw with a fine blade, then make a 2-1/8 inch hole into each of the sides. Use a router to round the hole opening’s edges. Once done place this piece on the top of the others to ensure everything is well aligned.
Using wood glue attach the No. 2 piece to the No. 3. Once done use your finger to spread a layer of glue on top of the No. 2.
Place the No. 1 on the top and ensure all the edges are even. Clamp all the pieces together and allow some time for drying. If you do not have any clamps, use any heavy object or some books instead.
Step 4
When the glue is totally dry, sand the edges and clean any dust or particles using a damp cloth. Then, stain, paint or varnish the amplifier. You can also use a sand paper to rough up the edges and add some texture to the wood. Finally add some layer of varnish to give it a nice overall look.
You are now done with your wooden iPhone amplifier. It is time to slide your iPhone into the system and turn on your favorite tunes.
Summary
The wood working router can be one of your greatest assets in the workshop. With a router you can play around with various techniques and skills and come up with almost anything. The only thing that can limit you when using your router is your creativity and the type of router and router bits available.
You can make a wooden iPhone router amplifier by following the above simple steps. In the beginning, this process may seem overwhelming but with patience and practice, you will do it with so much ease. All the materials required to do this will cost you a little money but in the end, you will come up with a masterpiece that is worth so much more. You can invite others once done to come and get a glance on what you have made from scratch. It is such a wonderful experience.

